- Maintenance
- Upper & Lower Kelly Valves
- Inside B.O.P. Dart Valves
- WN-1
- WN-2
WNCO Valve's WN-1 Valve Maintenance
Service & Maintenance
WNCO Valve's kelly valves are design engineered and manufactured to provide maximum life and minimum maintenance. At the heart of every WNCO Valve is the new WN-1 seal system. The double backup ring arrangement evenly distributes the sealing load for a more positive seal, resulting in longer o-ring life, reducing maintenance and increased reliability. This extra back-up protection, combined with tough, smooth Teflon seals between the ball valve and seat, provides the maximum resistance to corrosion and abrasion.
Types Of Repairs:
SEALS AND RINGS: Replacement of o-rings, backup rings, Teflon seals and the stem o-ring. Regular seal and ring replacement will substantially extend the life of the valve.
INTERNAL PARTS: Replacement of the spring, seat, ball and stem in addition to all rings and seals.
NOTE:
When the valve has been properly operating in a partially opened or closed position or for long periods of use with extremely corrosive fluids, replacement of all or some internal parts may be necessary. If internal metal parts show wear, replace them. If not, they may be returned to the valve. Always replace rings and seals, even if they appear not to be worn.
Disassembly
For all types of repairs, follow this step-by-step procedure to insure proper disassembly and reassembly:
-
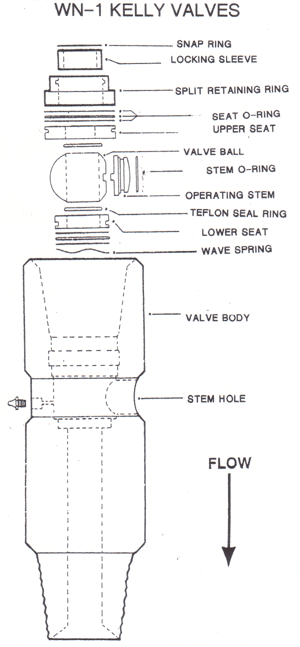
From the box end of the valve, remove the SNAP RING. Tap out the LOCKING SLEEVE. Loosen, pull (or tap) to the inside, and remove each of the three pieces of the SPLIT RETAINING SLEEVE. Tap out the UPPER SEAT using a wooden punch and being careful not to damage the seat.
-
Close the valve with the operating wrench. It must be in the FULL CLOSED position to remove the VALVE BALL. Use the wooden punch to knock the ball out the box end of the body. To remove the OPERATING STEM, fit the operating wrench into the stem. Knock the stem into the inside of the body by striking the wrench with a hammer.
-
Use the wooden punch to remove the LOWER SEAT being careful not to damage the seat during removal.
Inspection
-
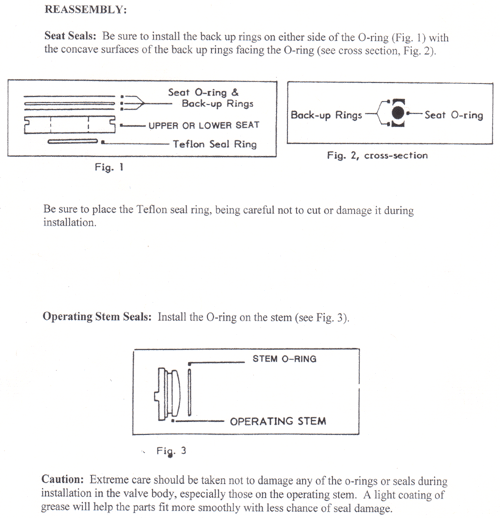
Carefully inspect all metal parts for wear, nicks, scrapes or deep abrasions and replace if necessary. Remove ALL o-rings and seals from the seat and stem, and install new WN-1 replacements,
-
Carefully check the stem hole in the body for damage. Buff out the stem hole to remove any corrosion, being careful not to remove too much metal. It is important that this surface is clean and smooth before reassembly. NOTE: If fluid has caused any washed areas in the stem hole, if any cracks are found in the stem hole, or if the stem hole has become too oversized, the valve should not be reassembled. Instead, return the valve body to WNCO Valve for repair. Often the body can be repaired by machining the stem hole to oversize specifications and installing an oversize operating stem.
-
Clean and inspect the box and pin connections and the operating stem hole as per standard blacklight, magnetic particle inspection. Either of the joints may be reworked if there is enough space left for tong purposes after the joint is remachined. If the stem hole is found cracked, even if no evidence of pressure leakage is detected, the valve body must be replaced. A crack in the stem area can severely weaken the strength of the valve.

Parts Assembly
-
Install the wave SPRING and the LOWER SEAT (with Teflon seal ring facing up). The OPERATING STEM should be put into place in the CLOSED POSITION. The VALVE BALL will slide easily into the stem cog. Install the UPPER SEAT (with Teflon seal facing down).
-
Insert the lower 3-jaw puller from the pin end of the body and grasp the UPPER SEAT with the jaws. Use a wrench to tighten the nut on the stem of the puller and compress the internal parts against the spring. Install the three pieces of the SPLIT RETAINING RING into the body groove and slide the LOCKING SLEEVE into place inside the split ring. Remove the 3-jaw puller. Install the snap ring.
-
Install a grease zert in the body. Use a heavy duty water repellent grease and grease the valve thoroughly. Remove the grease zert and install the plug.
The valve is now ready to be pressure tested and placed back in service or stored for future use.
Routine Maintenance
Lubrication: All WN-1 kelly valves are designed with a grease fitting located opposite the stem. At least three times a week, remove the plug, install the zert and lubricate with a heavy water repellent grease. Replace plug before resuming operation.
TIP: Always grease the valve thoroughly and operate the stem several times after removing the valve from the drill string, even if only storing the valve for a short period of time. This will help prevent drilling mud from setting up inside the valve and freezing the ball and stem.
Operation: Open and close the valve two or three times a week to help keep the parts free of debris. NEVER operate the valve in a partially open or closed position; always open or close the valve fully.
Testing: Check connections and pressure test regularly just as you would with all BOP equipment. Pressure test kelly valves according to API Spec. 7.
WN-1 Valves are precision manufactured to provide maximum life with a minimum of maintenance. Bt following these routine procedures, longer and more trouble free operation is assured.

